OVSDB Clustering Development Environment Setup
Doing development when your code requires at least 5 VMs to be up and running can get bit messy and bog down your machine. That’s what happen when you think of doing clustering related development work with OVSDB project. To test the OVSDB code running in clustering mode with OpenStack environment you need at minimum following setup:
- 3 VM’s running OVSDB code in cluster mode
- 2 VM running OpenStack services (Control/network and Compute node)
If you have high end configuration machine, probably you can manage to run all these 5 VM’s and make it work, but at least on my laptop with 16 gig of RAM and i7 processor, it was not at all fun. So what’s the alternative ? Container ;)
This blog provide instructions to setup the development environment on single host machine (Your laptop or big size VM) for doing clustering development work for the OpenDaylight OVSDB project. The final setup will have following elements
- 3 Docker containers running OpenDaylight OVSDB code in Karaf container/instance
- 2 VMs running OpenStack Control/Network and Compute node.
Assuming user already have these VM setup in it’s environment.
- All the 3 Karaf instances are using the .m2 (maven repo ) that exist on the host machine (in my case, it’s my laptop)
- 3 Docker containers and 2 VM are reachable to each other through a common bridge created on the host machine. Not through default
docker0bridge
This is how the final development setup will look like:

Let me explain a bit about the above setup. There are 2 VMs running OpenStack service. Both of these VM has connected to each other using two networks (Management and Data Network). Having two networks is not a requirement, you can use one network as well. I would recommend to configure static IP to the OpenStack VMs, so they don’t have to DHCP it. Apart from these 2 OpenStack VMs, there are 3 Docker container with the IPs - MGMT-IP-1, MGMT-IP-2 and MGMT-IP-3. All these VMs and Dockers are attached to one bridge (management) and has IP address from the same subnet that is served by the management bridge.
Following figure shows how it looks like when all the container start running Karaf instances:
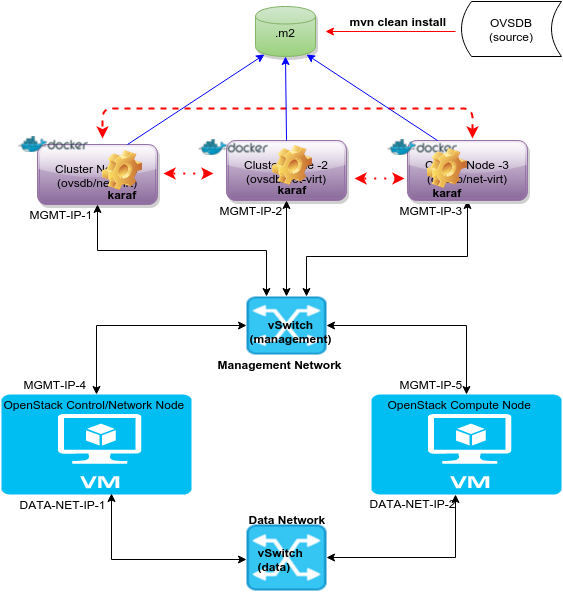
All 3 Docker containers will run OVSDB Karaf container and they will communicate to each other using their MGMT-IP-X IPs to form the cluster. All these Karaf containers will pick up artifacts from the .m2 repo that exist on the host machine. None of these containers have their own local .m2 repo.
With the above picture as a reference, this is how your development control flow will look like:
git cloneOVSDB project master branch code on the host machine (one time task)- Make changes to the code
- Build the code with
mvn clean install -DskipTests- It will generate latest artifacts and put in the local .m2 repo of the host machine - Login to your containers and restart the Karaf container and it should pick up your latest artifact from the host .m2 repo and execute the latest code
Assuming that your cluster setup is already done once and all the three docker containers are up and running.
Now lets get to the fun part.
Setup Instructions
Pre-requisite:
- Host machine running Ubuntu (or any other Linux distro)
- 8 gig+ RAM
- KVM should be installed. You can try even with virtual box, but you will have to take care of the networking by yourself. Following instructions are only for KVM.
Install Docker Engine on Ubuntu Trusty 14.04
Docker installation requires sudo access for the host machine login user. If you have sudo access, fire following command to install the Docker engine:
sudo apt-get update
sudo apt-get install curl
curl -sSL https://get.docker.com/ | sh
Provide sudo password if it prompts and then, it will download and install Docker and its required dependencies.
To verify the installation fire following command
sudo docker run hello-world
Above command will download hello-world Docker image from the DockerHub and run it in the container. If you reached successfully till this point, Docker is up and running on your host machine.
To avoid the use of sudo with the docker command, create a Unix group called docker and add users to it. When the docker daemon starts, it makes the ownership of the Unix socket read/writable by the docker group.
sudo usermod -aG docker <YOUR-LOCAL-USER>
Logout the user and log-in back. Now you should be able to run docker command without sudo. To verify it, fire the following command
docker run hello-world
If you are using some other version of Ubuntu, please follow the instruction provided on Ubuntu installation Page. This page also talks about some known issues with Docker and how to resolve it, so in case you face any of those issue you know where to look for. If you are not using Ubuntu on the host machine, follow Docker Installation Page to get the specific instruction for that Operating System.
Change the default bridge used by Docker
Docker engine creates default bridge name docker0. If you are already running OpenStack VMs on the host machine and they are connected to specific bridge OR if you don’t have existing OpenStack setup, then i would suggest create new local network bridge (e.g management) and use that to connect Docker containers and OpenStack VMs. In my environment i am running KVM, so i created Isolated Network Bridge and attach containers/VMs to it. If you are using Virtual Box you can create Host Only Network by following the instructions on this here. I would recommend to enable DHCP for your local virtual network bridge, so that Docker container can pick up the IP address through DHCP. Once local network bridge is setup on the host machine, let the docker engine know about it by editing the /etc/default/docker file
echo 'DOCKER_OPTS="-b=<YOUR-LOCAL-NETWORKING-BRIDGE"' >> /etc/default/docker
E.g echo 'DOCKER_OPTS="-b=management"' >> /etc/default/docker
Save the file and restart the docker engine
sudo service docker start
Get OpenDaylight OVSDB Docker image
I created a Docker image that contains empty Karaf distribution and a script to configure the local cluster node. Fire following command to pull the image on the host machine
docker pull avishnoi/odl-ovsdb-cluster-node-image:2.0.0
Above command can take some time given that it’s going to download a ~1G of image. Once above command finishes, you can see that the image is listed in
docker imagescommand’s output.

Let’s spawn the containers
Time to spawn the containers using the image you just downloaded. Open a terminal and fire following three commands to spawn three containers with different names.
docker run -d -t -v ~/.m2:/root/.m2/ --hostname=ovsdb-cluster-node-1 --name=ovsdb-cluster-node-1 avishnoi/odl-ovsdb-cluster-node-image:2.0.0
docker run -d -t -v ~/.m2:/root/.m2/ --hostname=ovsdb-cluster-node-2 --name=ovsdb-cluster-node-2 avishnoi/odl-ovsdb-cluster-node-image:2.0.0
docker run -d -t -v ~/.m2:/root/.m2/ --hostname=ovsdb-cluster-node-3 --name=ovsdb-cluster-node-3 avishnoi/odl-ovsdb-cluster-node-image:2.0.0
Above commands create container with name (--name=ovsdb-cluster-node-X) and host name (-hostname=ovsdb-cluster-node-X) using the image avishnoi/odl-ovsdb-cluster-node-image:2.0.0 and mount your host machine’s local .m2 repository (-v ~/.m2:/root/.m2) to /root/.m2/ directory in the container and run the container in detached (-d) mode.
You can choose host name (
--hostname)& container name (--name) of your choice. After executing above commands, If you firedocker pscommand on your host machine, you should see output similar to following output

All these container run in background (-d), so to connect to the console of the container fire following command
docker exec -it ovsdb-clsuter-node-X /bin/bash
Above command will give you access to the shell prompt of the container. It should look as follows
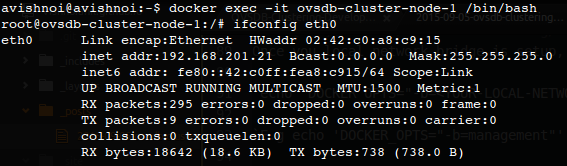
Setup 3 node OVSDB cluster
Login to all the three containers using the above command. Each container has only one interface so pick up the IP address of these containers (assume those IPs are MGMT-IP-1, MGMT-IP-2, MGMT-IP-3). Please make sure that all the containers are reachable from each other. Now follow the below instructions to setup each container.
cd /home/avishnoi/clustering/ovsdb/be/scripts/
I created very simple (probably buggy :) ) script to configure the clustering in local node and it expect following input
./configure-node.sh <local-node-role-name> <local-node-ip> <remove-node-1-ip> <remove-node-2-ip>
You should pick <local-node-role-name> from [member-1, member-2, member-3] only and don’t use same name for more then one container. To configure 3 node clustering, fire following commands on each container node
On ovsdb-container-node-1 (IP : MGMT-IP-1):
./configure-node.sh member-1 MGMT-IP-1 MGMT-IP-2 MGMT-IP-3
E.g ./configure-node.sh member-1 10.10.10.1 10.10.10.2 10.10.10.3
Please replace MGMT-IP-X with the real IP address of the container.
For each node, rest two nodes are remote nodes and ordering of ip address in the input does not matter.
On Ovsdb-container-node-2 (IP : MGMT-IP-2):
./configure-node.sh member-2 MGMT-IP-2 MGMT-IP-1 MGMT-IP-3
E.g ./configure-node.sh member-2 10.10.10.2 10.10.10.1 10.10.10.3
On Ovsdb-container-node-3 (IP : MGMT-IP-3):
./configure-node.sh member-3 MGMT-IP-3 MGMT-IP-1 MGMT-IP-2
E.g ./configure-node.sh member-3 10.10.10.3 10.10.10.1 10.10.10.2
That’s it, all the Karaf containers are configured for the clustering. If you accidently run script with wrong input, no worries, you can fire the same script again with the correct inputs, it will take care of the configuration. Now it’s time to fire up the OVSDB instances.
Start OVSDB instances (karaf container)
Before you start OVSDB instances, make sure that you cloned, build the code locally on the host machine and the latest artifacts that you want to execute are in .m2 repo.
On each node:
cd /home/avishnoi/clustering/ovsdb/be/karaf/target/assembly/bin/
./karaf
Or if you want to run it in background, fire
./start
Give it a good 5 minutes, so that cluster comes up properly.
Verify cluster is up and running
Login to one of the container and connect to the Karaf console using
./client -u karaf
Once you see the Karaf console, install jolokia feature
opendaylight-user@root>bundle:install -s mvn:org.jolokia/jolokia-osgi/1.1.4
Fire following rest conf request to the controller where you just installed jolokia
GET http://<MGMT-IP-X>:8181/jolokia/read/akka:type=Cluster
Response of above rest conf request should look as follows
{
   "timestamp":1441224590,
   "status":200,
   "request":{
      "mbean":"akka:type=Cluster",
      "type":"read"
   },
   "value":{
      "Available":true,
      "ClusterStatus":"{\n  \"self-address\": \"akka.tcp://opendaylight-cluster-data@10.10.10.1:2550\",\n  \"members\": [\n    {\n      \"address\": \"akka.tcp://opendaylight-cluster-data@10.10.10.1:2550\",\n      \"status\": \"Up\"\n    },\n    {\n      \"address\": \"akka.tcp://opendaylight-cluster-data@10.10.10.2:2550\",\n      \"status\": \"Up\"\n    },\n    {\n      \"address\": \"akka.tcp://opendaylight-cluster-data@10.10.10.3:2550\",\n      \"status\": \"Up\"\n    }\n  ],\n  \"unreachable\": [\n    \n  ]\n}\n",
      "Unreachable":"",
      "Members":"akka.tcp://opendaylight-cluster-data@10.10.10.1:2550,akka.tcp://opendaylight-cluster-data@10.10.10.2:2550,akka.tcp://opendaylight-cluster-data@10.10.10.3:2550",
      "Leader":"akka.tcp://opendaylight-cluster-data@10.10.10.1:2550",
      "MemberStatus":"Up",
      "Singleton":false
   }
 }
If you see output similar to the above, where all the nodes are listed in Members and one of them is listed in Leader, it means your cluster is up and running.
Other notes
- You don’t have to redo the cluster configuration if you restart your Karaf container.
- If you
exitout of the container andrestartit, you need to redo the cluster configuration, because these containers pick up new IP after restart.
Updates
- (30-Sep-2015) Uploaded 2.0.0 version of odl-ovsdb-cluster-node-image, that contains OVSDB southbound plugin container for both master and stable/lithium branch.
- (30-Sep-2015) If you want to invoke OVSDB southbound plugin container, go to
southbound-karafdirectory to run the./karafand useconfigure-southbound-karaf.shscript fromscriptsdirectory to configure the cluster node.